A retailer notices that the Account Addresses page is showing the wrong shopper’s address.
Which tool should the developer start with to identify the issue?
A. Pipeline profiler
B. Code Profiler
C. Storefront Toolkit
D. Reports and Dashboards Module
Explanation:
The Storefront Toolkit is the primary tool developers use to debug storefront-related issues, including session problems, customer account data, and personalization issues.
If the Account Addresses page is showing the wrong shopper’s address, it likely indicates a session, context, or personalization issue—such as data being pulled from the wrong customer or session scope.
Using the Storefront Toolkit, a developer can:
Impersonate shoppers
Inspect session and request scopes
View request parameters
Identify which customer is currently logged in
See the context in which components are being rendered
This makes it ideal for diagnosing issues where user-specific data appears incorrectly, such as in this case.
❌ Why not the others?
A. Pipeline Profiler
➤ Used to analyze performance and execution times of pipelines (relevant to SiteGenesis, not SFRA). Not suited for session or data integrity issues.
B. Code Profiler
➤ Useful for profiling backend code performance, not identifying session or shopper-specific display issues.
D. Reports and Dashboards Module
➤ This is used for business analytics and not for debugging technical or user-session-related issues.
Given the customer basket described below:
• A customer has an existing basket that consists of multiple items.
• One of the items is identified as a gift ítem by an attribute at the product line ítem.
The developer needs to write custom code to fetch the customer basket and then modify the basket based
upon the items in the cart. If the basket contains any gift items, modify the basket and create a separate
shipment for the gift item.
Four hooks are required to make the modification, beginning with modifyGETRespone and ending with
validatebasket.
• Dw.ocapi.shop.basket.modifyGETResponse
• - missing hook –
• - missing hook -
• dw.ocapi.shop.basket.validateBasket
What are the two missing hooks in the middle?
A. dw.ocapi.shop.basket.shipment.afterDELETE
B. dw.ocapi.shop.basket.shipment.beforePATCH
C.
dw.ocapi.shop.basket.shipment.beforeDELETE
D. dw.ocapi.shop.baskep.shopment.beforePOST
E. Estos indican antes de actualizar y antes de introduci
Explanation:
To implement logic that modifies the basket by creating a separate shipment for gift items, you need to intercept and manipulate the basket during shipment creation and update. The full hook sequence would be:
dw.ocapi.shop.basket.modifyGETResponse
Used to enrich the basket response with custom data (e.g., flag gift items)
dw.ocapi.shop.basket.shipment.beforePOST
Triggered before a new shipment is created
Ideal for assigning gift items to a new shipment
dw.ocapi.shop.basket.shipment.beforePATCH
Triggered before an existing shipment is updated
Useful for adjusting shipment details or reassigning items
dw.ocapi.shop.basket.validateBasket
Ensures the basket is valid before checkout
Can be used to confirm gift items are correctly separated
❌ Why the other options are incorrect
A. shipment.afterDELETE
Only runs after a shipment is deleted — not relevant to creating or modifying shipments.
C. shipment.beforeDELETE
Used when removing a shipment, not when creating or updating.
A business user wants to add a link to a content page from within the body of another content asset. The target
content asset ID is: terms-and-conditions.
Which link function generates the correct link?
A. $include(‘Page-Include’, ‘cid’, ‘terms-and-conditions’)$
B. $http(‘Content-Page’, ‘cid’, ‘terms-and-conditions’)$
C. $httpUrl(‘Content-Show’, ‘cid’, ‘terms-and-conditions’)$
D. $url(‘Page-Show’, ‘cid’, ‘terms-and-conditions’)$
Explanation:
In Salesforce B2C Commerce (SFRA), when you want to link to a content page from within another content asset, you need to generate a full absolute URL using the correct controller and parameters.
Content-Show is the controller used to display content assets.
cid is the parameter name for the Content Asset ID.
$httpUrl(...)$ is used to generate a full absolute URL (i.e., https://www.example.com/page-path), which is ideal when embedding links inside rich text or HTML in content assets.
Thus, this line:
$httpUrl('Content-Show', 'cid', 'terms-and-conditions')$
…generates a complete URL pointing to the terms-and-conditions content page.
❌ Why not the others?
A. $include('Page-Include', 'cid', 'terms-and-conditions')$
→ Used for server-side includes, not hyperlink generation.
B. $http('Content-Page', 'cid', 'terms-and-conditions')$
→ Content-Page is not a valid controller in SFRA.
D. $url('Page-Show', 'cid', 'terms-and-conditions')$
→ Page-Show is used for Page Designer pages, not standard content assets.
Given the following conditions:
• Site export file with a copy of the Storefront data for a custom site
• Sandbox with the custom site code, but no Storefront data
• Requirement for a working copy of SFRA for development reference
A developer is assigned the following Business manager tasks:
A. Import the custom Site using Site Import/Export
B. Import the SFRA Demo Sites using Site Import/Export
C. Rebuild the custom Site search indexes
In what sequence should the developer perform the tasks, so that the custom Site displays the products as intended?
A. Task A, then C, then B
B. Task B, then C, then Ap
C. Task A, then B, then C
D. Task B, then A, then C
Explanation:
To ensure the custom site displays products as intended and also has a working SFRA reference, the tasks must be completed in an order that builds up both the base functionality and the custom data properly:
🔢 Task Breakdown:
Task B: Import the SFRA Demo Sites
This sets up the baseline SFRA reference sites like RefArch or RefArchGlobal.
It includes necessary system objects, shared resources, and configurations that custom sites may depend on.
Without this, your custom site might reference missing resources or templates.
Task A: Import the custom site
After the baseline is in place, import the custom storefront data (products, categories, content assets, etc.).
This step builds on the data structure from the demo site if needed.
Task C: Rebuild the custom site's search indexes
After all data is imported, you must rebuild search indexes for the site.
This ensures products, categories, and other searchable content appear on the storefront.
A developer has custom debug statements in a script, but the messages are not showing up in the
Storefront Toolkit Request Log.
Which step needs to be completed to get the messages to appear in the Request Log?
A. In Global preferences, check the box for Enable custom logging in Request Log.
B. In Site Preferences, check the box for Enable custom Logging in Request Log
C. In Custom Log Settings, check the DEBUG box for Select Log Levels Written to Files.
D. In custom Log Settings, activate the loggin category at DEBUG level
Explanation:
For custom debug statements to appear in the Storefront Toolkit Request Log, the developer must:
Activate the Logging Category at DEBUG Level:
Navigate to Business Manager > Administration > Logging > Custom Log Settings.
Locate the specific logging category used in the script (e.g., my.custom.category).
Set the Log Level to DEBUG (or lower, e.g., INFO, ERROR).
Example code with logging category:
var log = Logger.getLogger('my.custom.category');
log.debug('Debug message'); // Will now appear in Request Log
Why Option D?
The Request Log only displays messages if:
The logging category is active.
The log level (e.g., DEBUG) matches or is lower than the configured level.
Why Not Other Options?
A/B (Global/Site Preferences):
There is no "Enable custom logging in Request Log" checkbox in preferences.
C (Select Log Levels Written to Files):
Controls log file output, not the Request Log in Storefront Toolkit.
The following code ensures that an address ID CANNOT be used if it is already in use by another address in the customer’s address book. There is a problem with the code. The error message for an invalid address ID is never shown to the user on the form field.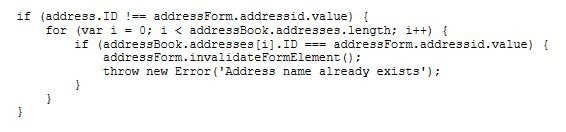
How should the Digital Developer resolve this issue so that the error message is displayed on the address ID form field?
A. addressForm.invalidateFormElement("addressid");
B. addressForm.addresssid.invalidateFormElement = true;
C. addressForm.invalidateFormElement(addressForm.addressid);
D. addressForm.addresssid.invalidateFormElement();
Explanation:
In Salesforce B2C Commerce, to invalidate a specific form field and show an error message on it, you must call:
addressForm.invalidateFormElement("addressid");
This method:
Marks the field as invalid
Triggers the display of the associated error message (e.g., value-error)
Ensures the user sees the feedback directly on the form field
❌ Why the other options are incorrect
B. addressForm.addressid.invalidateFormElement = true; This incorrectly tries to assign a boolean to a method — it won’t trigger validation.
C. addressForm.invalidateFormElement(addressForm.addressid); This passes the form element object instead of its string ID — not the expected argument type.
D. addressForm.addressid.invalidateFormElement(); This assumes invalidateFormElement is a method on the field object — it’s not.
Universal Containers wants to associate a region code value with an order to indicate the general area of its destination. This region code must be accessible whenever the order history is displayed.
What is required to accomplish this?
A. Store the region code value in a session variable.
B. Define a custom attribute on the Order system object type to store the region code value
C. Define a custom object type to store the username with the region code.
D. Store the region code value in the geolocation system attribute of the Orde
Explanation:
To persist data like a region code with an order and ensure it is available for display later (e.g., in order history), the best practice is to:
Extend the Order system object with a custom attribute (e.g., regionCode)
This makes the region code:
Saved with the order record in the database
Accessible across storefront, Business Manager, and APIs
❌ Why other options are incorrect:
A. Store in a session variable
🔴 Session variables are temporary and only last for the duration of the user session. Not suitable for long-term storage like order history.
C. Define a custom object type
🔴 Custom objects are best used for unrelated, standalone data. Associating data with orders is better handled with a custom attribute on the Order object.
D. Use the geolocation system attribute
🔴 geolocation stores latitude/longitude, not suitable for custom region code values. It's also not visible or intended for business logic.
A developer is writing a server side script that needs to maintain state across calls. The persistent
information needed includes these items.
• The current customer
• Whether or not the customer is authenticated
• The privacy attributes (such as tracking consent or cookie policy)
Which technique should the developer use to maintain state in an efficient and scalable manner that
follows best practice?
A. Use a non-replicable Custom Object to store the information temporarily
B. Use the Session class in the B2C Commerce api.
C. Use an SFRA controller, because it runs server-side, the state is automatically maintained
D. Use a client-side cookie to store the information for the session duration
Explanation:
In Salesforce B2C Commerce, the Session class is the recommended and scalable way to maintain state across server-side calls during a shopper's visit. It provides access to:
Current customer: via session.customer
Authentication status: via session.customer.authenticated
Privacy attributes: via session.privacy (e.g., tracking consent, cookie policy)
✅ Example Usage:
var customer = session.customer;
var isAuthenticated = customer.authenticated;
var trackingConsent = session.privacy.trackingConsent;
These values persist throughout the session and are automatically scoped to the current user, making them ideal for temporary state management.
❌ Why the other options are incorrect
A. Non-replicable Custom Object Custom Objects are not designed for session-level state. They are persisted in the database and not efficient for transient data.
C. SFRA controller automatically maintains state SFRA controllers are stateless between requests. You must explicitly use session or other mechanisms to persist data.
D. Client-side cookie Storing sensitive data like authentication or privacy preferences in client-side cookies is insecure and violates best practices.
Given a job step configured in the steptype.json, a developer needs to add a custom status code
“No_FILES_FOUND”.
Which code snippet will complete the requirement?
A. var status = {success: ‘OK’. Message: ‘NO_FILES_FOUND’};
return status
B. var status = {success: ‘OK’. Message: ‘NO_FILES_FOUND’};
return status
C. var status = require(‘dw/system/status’);
return new Status(Status.OK, ‘NO_FILES_FOUND’);
D. this.status = ‘NO_FILES_FOUND’
return this;
E. return ‘NO_FILES_FOUND
Explanation:
In a task-oriented CommonJS job step, you control the exit status using the dw.system.Status class. This allows you to:
Indicate whether the step succeeded or failed
Provide a custom status code (like "NO_FILES_FOUND")
Optionally include a message
✅ Correct Implementation:
var Status = require('dw/system/Status');
return new Status(Status.OK, 'NO_FILES_FOUND');
This tells the job framework:
The step completed successfully (Status.OK)
The custom status code is "NO_FILES_FOUND" — which can be referenced in the steptypes.json file
❌ Why the other options are incorrect
A & B (object literal with success and Message) These are not valid return types for job steps. The framework expects a Status object.
C. this.status = 'NO_FILES_FOUND' this is not used for returning status in job steps.
D. return 'NO_FILES_FOUND' Returning a string does not provide the structured status object required by the job framework.
Once the Cache Information tool of the storefront toolkit is enabled, how can a Digital Developer view caching information for a particular component of the page?
A. Hover over the caching icons now present on the storefront.
B. Open the Request Logs to view the caching information.
C. Start a pipeline debugging session and view the caching information provided.
D. Right-click on the component in UX Studio and view the caching properties of the file.
Explanation:
When you enable the Cache Information tool in the Storefront Toolkit, the site displays small caching icons (usually in red, yellow, or green) over various page components to indicate their caching status.
To view detailed caching information for a specific component:
Simply hover over these icons.
A tooltip will appear showing details like:
Cache status (cached / not cached)
Cache time-to-live (TTL)
Cache ID
❌ Why the other options are incorrect:
B. Open the Request Logs
The request log provides useful diagnostics but does not show per-component cache info.
C. Start a pipeline debugging session
Pipelines are legacy and not used in SFRA. Even if debugging, it doesn't show storefront cache overlay info.
D. Right-click in UX Studio
UX Studio lets you edit metadata and templates, but does not display runtime cache data from the storefront.
When inspecting the weekly service status report for a critical internally hosted web service used in the
application, a developer notices that there are too many instances of unavailability.
Which two solutions can reduce the unavailability of the service?
Choose 2 answers.
A. Update the service to have a faster response time.
B. Modify the code that makes the request to the external service to be wrapped in a try/catch block.
C. Increase the web service time out
D. Change the code that sets the throwOnError attribute of the service to be true.
Explanation:
To reduce unavailability of a critical internally hosted web service, the developer should:
B. Wrap Requests in Try/Catch Blocks
Why? Prevents unhandled exceptions from crashing the application when the service fails.
Example:
try {
var response = HTTPClient.request(serviceURL);
} catch (e) {
Logger.error('Service unavailable: ' + e.message);
// Fallback logic (e.g., cached data)
}
C. Increase the Web Service Timeout
Why? Prevents premature failures due to temporary latency spikes.
How? Adjust the timeout in Business Manager (Administration > Operations > Services) or code:
service.setTimeout(5000); // Increase from default (e.g., 2s to 5s)
Why Not Other Options?
A. Faster Response Time: Requires service-side optimizations (not controlled by the developer).
D. throwOnError=true: Forces failures to throw exceptions (increases unavailability).
Given the requirements:
• To integrate with an external web service using HTTP requests
• To create a service for this purpose with the Service framework using the LocalServiceRegistry
class.
• To test the service before the external service provider makes the API available
Which solution allows the developer to satisfy the requirements?
A. Create a service and implement the mockfull callback and a sitepreference to enable or disable the mock response.
B. Create a service and implement the mockFill callback and set the service mode to mock.
C. Create a service and a Sitepreference that induce the service to respond witch a mock response using a conditional.
D. Create two services, one mock and the real one, and a Sitepreference that enable the mock or the real one
Explanation:
To test a web service integration before the external API is available, Salesforce B2C Commerce provides a built-in mocking mechanism via the Service Framework. The recommended approach is:
✅ Step-by-step:
Create the service using LocalServiceRegistry.createService(...)
Implement the mockFill callback in the service definition
This callback simulates the entire service lifecycle: request creation, execution, and response parsing
Set the service mode to mock in Business Manager:
Go to: Administration > Operations > Services
Select your service and set Service Mode to Mocked
✅ Example:
var service = LocalServiceRegistry.createService('my.http.service', {
mockFill: function (svc, args) {
return {
status: 'OK',
object: {
responseCode: 200,
message: 'Mocked response'
}
};
},
createRequest: function (svc, args) {
// Normally used in live mode
},
parseResponse: function (svc, response) {
// Normally used in live mode
}
});
❌ Why the other options are incorrect
A. mockfull callback and site preference toggle mockFull is a valid callback, but using a site preference to toggle mocking is not required and adds unnecessary complexity.
C. Site preference conditional logic Again, not needed. The Service Framework already supports mocking via configuration.
D. Two separate services (mock and real) This is inefficient and harder to maintain. The Service Framework is designed to handle mocking within a single service definition.
| Page 7 out of 17 Pages |
| Previous |