Topic 5: Misc. Questions
A company uses Dynamics 365 Business Central.
The company performs an annual review of customer prices and determines that sales
prices must rise by 10% for the coming year. You need to adjust the prices. What should
you do?
A. Manually add new lines to the Sales Lines Discount page.
B. Use the action Suggest Sales Price on Worksheet.
C. Manually add a sales price to the Sales Prices page.
D. Manually add a sales price to the Sales Price Worksheet page.
Explanation:
A company-wide price increase of 10% for all customer prices is a bulk update scenario. The efficient method in Business Central is to use a batch process that automatically calculates new prices based on existing ones, rather than manually editing thousands of individual price records.
Correct Option:
B. Use the action Suggest Sales Price on Worksheet.
Explanation:
The Sales Price Worksheet is specifically designed for bulk creation and updates of sales prices. The Suggest Sales Price action can copy existing prices from items and then apply a universal adjustment factor (like 110% for a 10% increase) to propose new price lines, which can then be reviewed and implemented in batch.
Incorrect Options:
A. Manually add new lines to the Sales Lines Discount page:
This page is for setting discounts that apply to document lines, not for defining the base sales price per item per customer. It is not the correct tool for a universal price update.
C. Manually add a sales price to the Sales Prices page:
While this is where sales prices are stored, manually adding or editing prices here one-by-one is extremely inefficient for a company-wide 10% increase across potentially many items and customer price groups.
D. Manually add a sales price to the Sales Price Worksheet page:
You could manually enter lines here, but this is still a manual, line-by-line process. The key differentiator is using the Suggest Sales Price action on the worksheet to automate the proposal of new prices based on a percentage increase, which is the efficient solution.
Reference:
Microsoft Learn documentation "Update Multiple Item Prices." The Sales Price Worksheet with the Suggest Sales Price function is the recommended tool for performing mass updates to sales prices, as it allows for applying a multiplier or adding a fixed amount to existing prices.
A company uses Dynamics 365 Business Central. The company has three sites.
The company needs to track inventory separately for each site.
You need to configure the system to meet this requirement.
What should you configure?
A. Warehouse
B. In-Transit location
C. Location
D. Responsibility center
Explanation:
To track inventory separately by physical site, you must define each site as a distinct inventory storage location. This allows for separate stock levels, value, and transactions to be recorded for each place. The feature designed for this purpose is the primary inventory dimension for physical storage.
Correct Option:
C. Location
Explanation:
A Location in Business Central represents a physical site or warehouse where inventory is stored and tracked. By setting up three separate locations and assigning them to transactions, you achieve separate inventory tracking, valuation, and reporting for each site. This is the core configuration for multi-site inventory management.
Incorrect Options:
A. Warehouse:
A Warehouse is a sub-feature within a location that enables more complex handling processes (like bins, pick waves, shipments). It is not the primary entity for separating inventory by site; a single Location can contain multiple warehouses. The site itself must first be defined as a Location.
B. In-Transit location:
This is a special system-defined Location (code often 'TRANSIT') used to track items while they are being transferred between two regular locations. It is not used to define permanent, physical inventory sites for daily tracking.
D. Responsibility center:
This is an organizational unit (like a department or regional office) used to manage and report on business activities and costs. It does not track physical inventory stock; it is a management dimension, not an inventory location.
Reference:
Microsoft Learn documentation "Set Up Locations." Locations are defined as places "where you buy or sell items, and where you maintain inventory." They are the fundamental building block for inventory segregation by physical site.
You need to transfer opening balances data into the system.
Solution: Transfer balances by using the Copy Company function.
Does the solution meet the goal?
A. Yes
B. No
Explanation:
The Copy Company function is specifically designed for this purpose. It allows you to create a new company and copy all or selected data—including G/L accounts, customers, vendors, and their opening balances—from an existing company or template. This is the standard tool for initializing a new company with baseline financial data.
Correct Option:
A. Yes
Explanation:
The Copy Company function is the correct method to transfer opening balances data into a new system. It replicates the chart of accounts, master data, and importantly, the opening balance figures from the source company (or a company used as a data template) to the destination company, efficiently setting up the initial trial balance.
Incorrect Option:
B. No:
This would be incorrect because the proposed solution is valid. Alternative methods like manual data entry in journals or using RapidStart configuration packages exist, but the Copy Company function is a direct and supported method specifically for transferring company setup data, including opening balances, from one company to another within the same environment.
Reference:
Microsoft Learn documentation "Copy a Company." It states you can copy "master data, transactions, and all amounts" to a new company. For implementing opening balances, this includes copying G/L accounts with their net changes (which represent opening balances in a new company).
You are setting up new customers and items in Dynamics 365 Business Central.
You need to configure the system.
Which posting group should you use? To answer, drag the appropriate posting groups to
the correct use cases. Each posting group may be used once, more than once, or not at all.
You may need to drag the split bar between panes or scroll to view content.
NOTE: Each correct selection is worth one point.
Explanation:
Posting groups link business entities (like customers and items) to the specific general ledger accounts where transactions are posted. Customer Posting Groups determine the accounts for receivables transactions, while General Posting Groups (combining Gen. Bus. and Gen. Prod.) determine the accounts for inventory and COGS transactions. Their account types (Income Statement vs. Balance Sheet) are predefined in the G/L Account setup.
Correct Option Mapping:
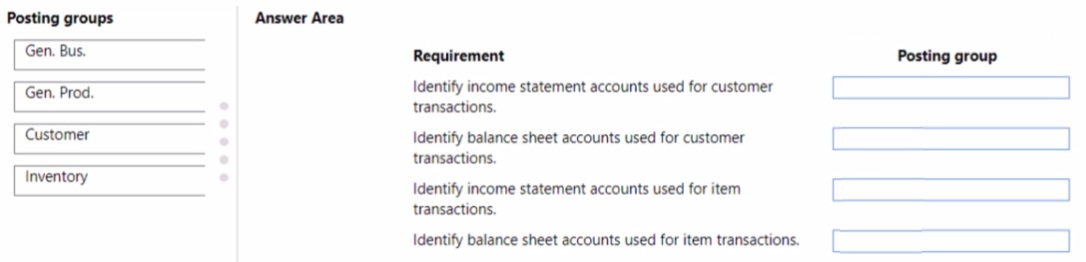
Requirement: Identify income statement accounts used for customer transactions.
Correct Posting Group: Customer
Explanation:
The Customer Posting Group defines the accounts for receivables. The Sales Account field within this setup points to an Income Statement account (e.g., a revenue account) where sales to this customer are posted.
Requirement: Identify balance sheet accounts used for customer transactions.
Correct Posting Group: Customer
Explanation:
The same Customer Posting Group also contains the Receivables Account field. This field must point to a Balance Sheet account (typically an asset account for Accounts Receivable) where the outstanding customer balance is tracked.
Requirement: Identify income statement accounts used for item transactions.
Correct Posting Group: Gen. Prod.
Explanation:
General Product Posting Groups (Gen. Prod.) are linked to items. Within the General Posting Setup (which combines a Gen. Bus. Posting Group and a Gen. Prod. Posting Group), key Income Statement accounts are defined, such as the Sales Account, COGS Account, and Inventory Adjmt. Account.
Incorrect Options:
Gen. Bus. (General Business Posting Group):
This is linked to customers/vendors and defines aspects like the G/L accounts for sales/purchase discounts and prepayments. While used in conjunction with Gen. Prod. in the General Posting Setup, the question about item transactions specifically points to the product side (Gen. Prod.).
Inventory:
There is no standalone "Inventory" posting group. Inventory-related G/L accounts (Inventory, COGS, etc.) are defined in the General Posting Setup, which uses the Gen. Prod. Posting Group.
Reference:
Microsoft Learn documentation "Setting Up Posting Groups." The Customer Posting Group manages customer-related G/L accounts, while the combination of General Business and General Product Posting Groups in the General Posting Setup manages the income statement accounts for item sales and costs.
You are implementing Dynamics 365 Business Central.
You are unable to view some expected functionality in the system.
You need to demonstrate the use of different options for assigning profiles to users.
In which three places can you assign profiles to users? Each correct answer presents a
complete solution.
NOTE: Each correct selection is worth one point.
A. Assign a User Group to the user. Assign the Profile to the User Group.
B. Assign a Profile on the User Personalization page.
C. Assign the Profile on the User card.
D. Accept the default Profile.
E. Add the user to the Profile card.
Explanation:
Profiles (formerly Roles) define the user's Role Center and UI layout. They can be assigned to users through several direct and indirect methods within Business Central's administration tools.
Correct Options:
A. Assign a User Group to the user. Assign the Profile to the User Group:
This is an indirect but efficient method. You can assign a Profile ID to a User Group on the User Groups page. Then, any user added to that group inherits the profile from the group, enabling mass profile assignment.
B. Assign a Profile on the User Personalization page:
You can assign or change a profile for a specific user by going to Users > select a user > User Personalization. This is a direct, per-user assignment method.
D. Accept the default Profile:
When a user first signs in and no other profile is assigned, Business Central assigns a Default Profile (configured in Profiles with the Default Role Center checkbox). This is an automatic assignment method.
Incorrect Options:
C. Assign the Profile on the User card:
While you assign Permission Sets on the User card, you cannot directly assign a Profile there. Profile assignment is done via the User Personalization page (Option B), User Groups (Option A), or by default.
E. Add the user to the Profile card:
This is backwards. You assign a profile to a user (or group), not add a user to a profile. The Profile card is for configuring the profile's properties (like Role Center), not for managing user membership.
Reference:
Microsoft Learn documentation "Managing Profiles and Role Centers." It details that profiles can be assigned: 1) Automatically as a default, 2) Manually per user via User Personalization, and 3) To all members of a User Group via the User Group card.
You need to configure Dynamics 365 Business Central to allow for receipt of quantities of
items greater than the quantity ordered.
What are two possible ways to achieve the goal? Each correct answer presents a complete
solution.
NOTE: Each correct selection is worth one point.
A. Configure a maximum order quantity for the item
B. Configure a maximum inventory level for the item
C. Set up and select an over-receipt code in the item record
D. Set up and select an over-receipt code in the vendor record
Explanation:
Over-receiving means accepting more goods than originally ordered on a purchase order. Business Central controls this tolerance through Over-Receipt Codes, which define the allowed percentage or quantity of excess. This control can be set at the item level for blanket rules or at the vendor level for specific supplier agreements.
Correct Options:
C. Set up and select an over-receipt code in the item record:
You can define an Over-Receipt Code on the Item Card (Purchasing FastTab). This applies a default over-receipt tolerance to all purchase orders for that specific item, regardless of the vendor.
D. Set up and select an over-receipt code in the vendor record:
You can define an Over-Receipt Code on the Vendor Card (Purchasing FastTab). This applies a default over-receipt tolerance to all purchase orders from that specific vendor, for any items.
Incorrect Options:
A. Configure a maximum order quantity for the item:
The Maximum Order Quantity on the item card is a planning parameter used by the MRP engine to suggest order quantities. It does not control or allow exceeding the ordered quantity during goods receipt posting; it's a planning limit, not a receiving tolerance.
B. Configure a maximum inventory level for the item:
The Maximum Inventory on the item card is another planning parameter used for replenishment calculations. It sets a target ceiling for total stock but does not enable or disable the ability to receive more than the purchase order quantity during posting.
Reference:
Microsoft Learn documentation "Enable Receipt of More Items than Ordered." It explicitly states that to allow over-receipt, you must set up over-receipt codes and assign them to items or vendors. These codes define the tolerance that is then applied on purchase order lines.
A company is implementing Business Central. The company is evaluating Microsoft Power
Platform integration benefits. The company has the following business requirements:
• Provide financial reporting in real-time.
• Automate customer onboarding in Business Central.
• Create a workflow that automates invoice approvals.
• Integrate item scanning capabilities in the warehouse.
You need to evaluate the specified business requirements and align them with Microsoft
solutions that can meet each need effectively.
Which Microsoft Power Platform tools should you recommend? To answer, move the
appropriate business Microsoft Power Platform tools to the correct requirements. You may
use each Microsoft Power Platform tool once, more than once, or not at all. You may need
to move the split bar between panes or scroll to view content.
NOTE: Each correct selection is worth one point.
Explanation:
This question maps common business needs to the core Power Platform services that extend Business Central. Power BI is for analytics, Power Apps for custom applications, and Power Automate for workflow automation.
Correct Option Mapping:
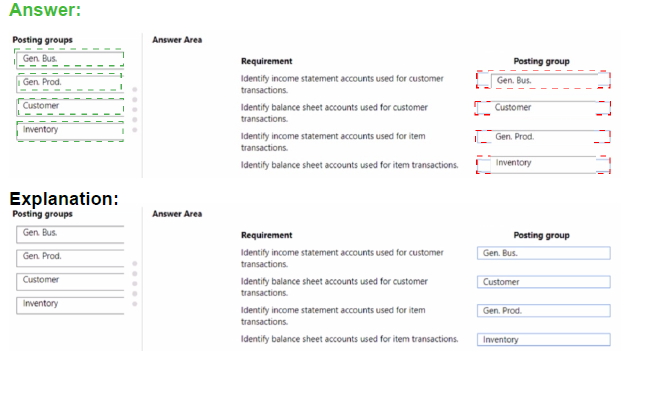
Business requirement: Real-time financial reporting
Correct Tool: Power BI
Explanation:
Power BI is the analytics and visualization tool. It connects directly to Business Central data (via APIs or connector) to create live dashboards and interactive reports, providing real-time financial insights.
Business requirement: Automated customer onboarding
Correct Tool: Power Apps
Explanation:
Power Apps is used to build custom business applications without code. You can create an app for customer self-registration or for internal staff to input customer data, which then creates records in Business Central via the connector, automating the onboarding process.
Business requirement: Automated invoice approval workflow
Correct Tool: Power Automate
Explanation:
Power Automate is the workflow automation service. You can build a flow that triggers when an invoice is created, sends it for approval (e.g., via email or Teams), records the response, and updates the Business Central record, automating the entire approval chain.
Business requirement: Integrated item scanning capabilities
Correct Tool: Power Apps
Explanation:
Power Apps can be used to build a mobile warehouse scanning app. The app uses the device's camera as a barcode scanner, looks up or updates item information, and integrates directly with Business Central's APIs to register movements, providing integrated scanning capabilities.
Incorrect Options:
OneDrive:
This is a cloud storage service, not a primary application development or workflow automation tool. While it can store documents related to these processes, it does not directly "automate," "report," or "integrate scanning" with Business Central data in the way the Power Platform tools do.
Reference:
Microsoft's documentation on extending Business Central with the Power Platform. Power BI for reporting, Power Apps for custom apps and mobile solutions, and Power Automate for automated workflows are standard pairings.
You are implementing Dynamics 365 Business Central.
You use infinite items such as water, electricity, and natural gas.
You need to set up the items.
Which item type should you use for infinite items?
A. Resource
B. Inventory
C. Service
D. Non-Inventory
Explanation:
Infinite items like utilities (water, electricity) are not physical goods held in stock (Inventory), nor are they a person or machine's time (Resource), or a professional service (Service). They are purchased and consumed but not tracked as inventory. The correct type is for items used in transactions without tracking quantity on hand.
Correct Option:
D. Non-Inventory
Explanation:
The Non-Inventory item type is designed for goods or materials that a company buys or sells but does not track as inventory. These items have no quantity on hand, and their costs are expensed directly upon purchase. This perfectly suits infinite items like utilities, which are consumed as purchased and are not stored or tracked in stock.
Incorrect Options:
A. Resource:
This type represents work capacity (people or machines) used in jobs or service management. It tracks hours and costs for labor or equipment usage, not for consumable goods like water or electricity.
B. Inventory:
This type is for physical goods that are stocked, tracked for quantity and value, and use full inventory costing and valuation. Infinite items are not stored or physically counted.
C. Service:
This type is for intangible work performed, like consulting hours or maintenance work. While it is also not tracked in inventory, it is designed for labor-based services, not for consumable commodity goods purchased from a utility company.
Reference:
Microsoft Learn documentation on "Item Types." It specifies that Non-Inventory items are for "goods that you buy or sell but that you do not track inventory for," making them the appropriate choice for consumable commodities or infinite items.
You have multiple, unpaid posted purchase invoices to reverse. Some invoices require
complete reversal while others need partial reversal.
You need to process credit memos from the posted purchase invoices.
Which actions should you perform? To answer, drag the appropriate actions to the correct
requirements. Each action may be used once, more than once, or not at all. You may need
to drag the split bar between panes or scroll to view content.
NOTE: Each correct selection is worth one point.
Explanation:
This question distinguishes between the different corrective actions available for posted purchase documents. Cancel is for fully voiding unpaid invoices, Correct is for automatically creating a full reversing credit memo, and Create Corrective Credit Memo is for manually creating a partial or full credit memo.
Correct Option Mapping:
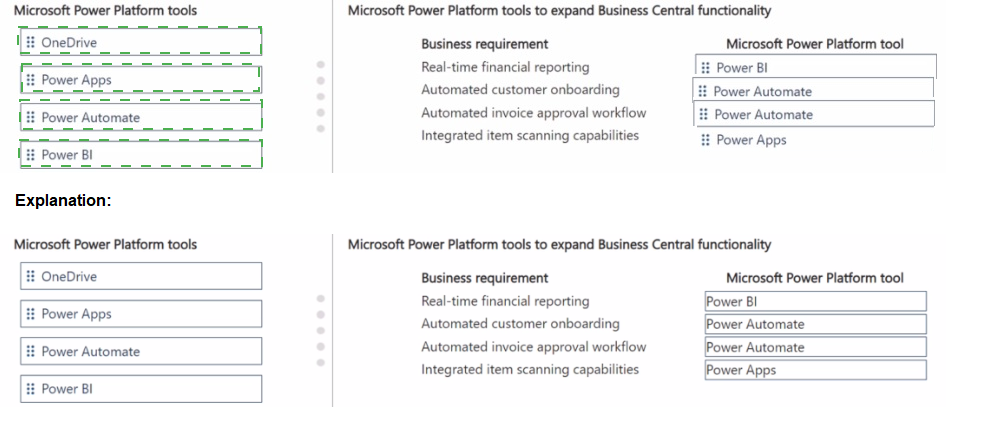
Requirement: Automatically create and post a corrective purchase credit memo to void the initial posted purchase invoice.
Correct Action: Correct
Explanation:
The Correct action, available from a posted purchase invoice, automatically creates and posts a purchase credit memo that is an exact negative copy of the original invoice. This fully reverses the original invoice in one step, voiding it.
Requirement: Enable users to manually post credit memos.
Correct Action: Create Corrective Credit Memo
Explanation:
The Create Corrective Credit Memo action opens a new purchase credit memo pre-filled with the lines from the posted invoice. The user can then manually edit quantities/amounts (for partial reversal) or post it. This gives full manual control over the credit memo before posting.
Requirement: Create a new purchase invoice to replace a canceled invoice.
Correct Action: Cancel
Explanation:
The Cancel action is used on unpaid posted invoices to void them without creating a credit memo. It simply marks the invoice as canceled, freeing up the document numbers and allowing you to create a brand new, replacement purchase invoice from scratch.
Incorrect Options:
There are no remaining unused actions if mapped correctly. Each action maps to one specific requirement based on its function: Cancel voids, Correct auto-reverses, Create Corrective Credit Memo enables manual creation.
Reference:
Microsoft Learn documentation "Correct or Cancel Unpaid Purchase Invoices." It defines Cancel to free up numbers, Correct to automatically reverse, and Create Corrective Credit Memo to manually create a credit memo linked to the original invoice.
A company uses Dynamics 365 Business Central.
You need to configure the system to automatically add any appropriate sales invoice
discounts to sales documents.
What should you do?
A. On the Sales & Receivables Setup page, select Cak. Inv. Discount.
B. On the Sales & Receivables Setup page, select Invoice Discount in Discount Posting.
C. On the Sales & Receivables Setup page, select Lowest Price in Price Calculation Method.
D. On the Customer card, select Invoice Disc. Code.
Explanation:
To have the system automatically calculate and add invoice discounts to sales documents, you must enable the calculation feature in the core sales setup. The key is to activate the option that performs this automatic calculation, not just to define the discount codes themselves.
Correct Option:
A. On the Sales & Receivables Setup page, select Calc. Inv. Discount.
Explanation:
The Calc. Inv. Discount (Calculate Invoice Discount) checkbox on the Sales & Receivables Setup page is the master switch. When enabled, Business Central automatically calculates invoice discounts on sales documents based on the customer's Invoice Disc. Code and the document total, adding the discount line if the criteria are met.
Incorrect Options:
B. On the Sales & Receivables Setup page, select Invoice Discount in Discount Posting:
The Discount Posting field determines how the discount amount is posted to the general ledger (as a separate G/L account or as part of the sales amount). It does not enable the automatic calculation of the discount.
C. On the Sales & Receivables Setup page, select Lowest Price in Price Calculation Method:
The Price Calculation Method determines which price (e.g., lowest, highest) is used from multiple sales price agreements. This is for unit prices, not for invoice-level discounts.
D. On the Customer card, select Invoice Disc. Code:
This assigns a specific invoice discount code to the customer, which defines the discount percentage tiers. However, this alone will not cause automatic calculation; the Calc. Inv. Discount global switch must also be turned ON.
Reference:
Microsoft Learn documentation "Set Up Sales Invoice Discounts." It states that to enable automatic calculation, you must select the Calc. Inv. Discount check box in Sales & Receivables Setup. The discount code on the customer card is the prerequisite data, but the setup switch is the enabling action.
A company uses Dynamics 365 Business Central. The company has two finance
managers.
You need to configure approval workflow for purchase orders. Only one manager is
required to approve a purchase order.
How should you complete the configuration? To answer, drag the pages to the correct
requirements. Each page may be used once, more than once, or not at all. You may need
to drag the split bar between panes or scroll to view content.
NOTE: Each correct selection is worth one point.
Explanation:
Setting up an approval workflow involves creating the workflow steps, defining the approvers, and configuring their approval limits and sequence. Each listed page serves a distinct purpose in this configuration process.
Correct Option Mapping:
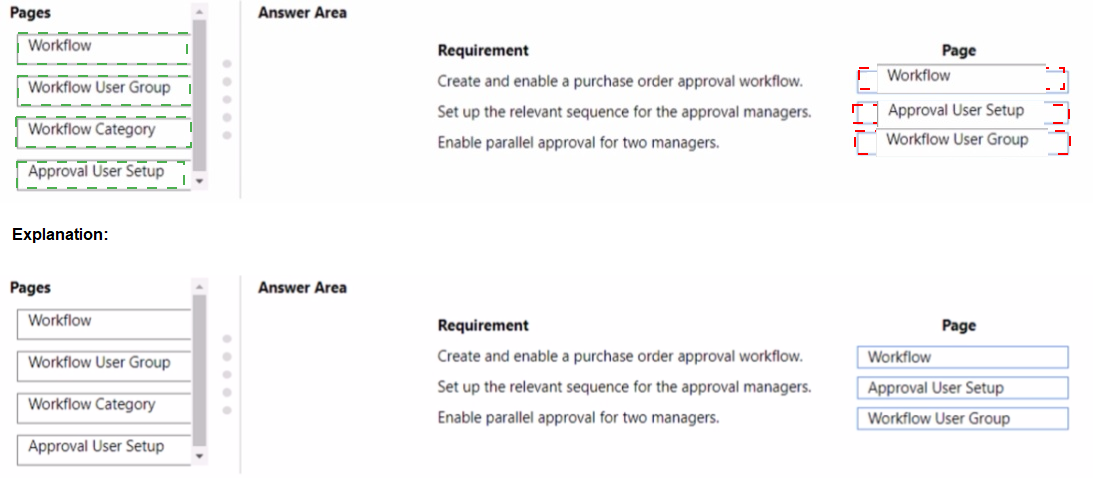
Requirement: Create and enable a purchase order approval workflow.
Correct Page: Workflow
Explanation:
The Workflow page is where you create the actual workflow template. You specify the trigger event (e.g., "Purchase Order is released") and the response steps (e.g., "Send Purchase Order for approval"). You must also enable the workflow on this page for it to become active.
Requirement: Set up the relevant sequence for the approval managers.
Correct Page: Approval User Setup
Explanation:
On the Approval User Setup page, you define the approval hierarchy or sequence. For each user, you specify their Approver ID. This creates an "approver chain," establishing the order in which approval requests are routed (e.g., Manager A, then Manager B).
Requirement: Enable parallel approval for two managers.
Correct Page: Workflow
Explanation:
Parallel approval is configured within the Workflow definition. When adding the "Send for Approval" response step, you can assign multiple approvers in the same step by selecting multiple user IDs or a Workflow User Group. This sends the request to all designated approvers simultaneously, and only one needs to approve.
Incorrect Options:
Workflow User Group:
This page is used to create groups of users (like the two finance managers) for easy selection in workflow steps. While you could use it for the parallel approval step, the requirement specifies enabling the feature, which is done in the Workflow page itself. The question's structure implies using the listed pages directly.
Workflow Category:
This page is for organizing workflows into categories for easier search and management. It does not configure approval sequences or enable parallel approval.
Reference:
Microsoft Learn documentation "Set Up Approval Workflows." The Workflow page creates the workflow, Approval User Setup defines the sequence/chain, and parallel approval is achieved by assigning multiple approvers in a single workflow step.
A company uses Dynamics 365 Business Central. You manage customer master data for the company.
You need to create new customers.
What are three possible ways to achieve the goal? Each correct answer presents a
complete solution.
NOTE: Each correct selection is worth one point.
A. On the Contacts page, select Related Information and then select Customer
B. On the Contacts page, select Create as Customer.
C. On the Configuration Template Header for the customer table, select Create Instance.
D. On the Customers page, select New.
E. On the Customer card, select Apply Template.
Explanation:
New customers can be created directly, from contact data, or by using configuration templates. The question asks for three possible ways, focusing on standard creation methods.
Correct Options:
B. On the Contacts page, select Create as Customer:
This is a standard method. When you have a contact (person or company) created, you can convert it into a customer master record directly from the contact card using the Create As > Customer action, which links the customer to the contact.
C. On the Configuration Template Header for the customer table, select Create Instance:
This uses Configuration Templates. After creating a template for the Customer table with predefined values, you can use the Create Instance action to generate a new, editable customer card populated with the template's defaults.
D. On the Customers page, select New:
This is the most direct method. From the Customers list page, the New action opens a blank customer card for manual data entry to create a new customer record.
Incorrect Options:
A. On the Contacts page, select Related Information and then select Customer:
This navigates to view any existing customer already linked to the selected contact, via the Customer field in the Business Relation section. It does not create a new customer; it only shows a linked one.
E. On the Customer card, select Apply Template:
The Apply Template action on a Customer Card is used to overwrite the fields of an existing customer with values from a template. It is used for modifying existing records, not for creating brand new customers from scratch.
Reference:
Microsoft Learn documentation on creating customers: using the New action, converting from Contacts, and using Configuration Packages/Templates are all standard methods. Option A shows linkage, not creation. Option E is for applying templates to existing records, not initial creation.
| Page 2 out of 17 Pages |
| Previous |